As you saw yesterday, the basic fair isle technique covers the back of the work with what are called “floats.” This is because, although you’re using two strands of yarn for every row, you’re only using one of them for any given stitch, so the unused yarn is “stranded” around the back. (The name “fair isle” comes from the Scottish island of that name; the technique is also called “stranded” knitting. Though I imagine living on a small island would also make one feel “stranded.” Haha.)
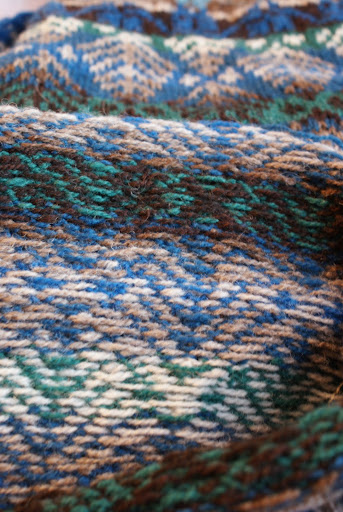
This is all well and good if you only make a few stitches at a time of one color before switching to the other. Then your “float” is only a few stitches long, and sits nicely at the back of the work. The longest conventional float is five stitches wide. Many traditional fair isle patterns are specifically designed with small motifs, so they only have short floats. However, many (if not most) designs include at least the occasional stretch of 6 or more stitches. This creates an ungainly long float, which can get hang out as a loop on the back, getting snagged on things and messing up the tension of your work.
One way to deal with long floats is by twisting it halfway across. So lets say you have a 6-stitch stretch of one color; you’d knit 3, cross the yarns over each other, then go on to do the last three stitches. The problem is, if you get in a lovely rhythm using the method described in the last post, it’s a bit of a pain to have to stop and twist the yarns, especially if you have to do it often. It also doesn’t look as cool on the back.
An alternative technique catches the yarn behind a stitch as its made, meaning you don’t have to disrupt your flow or do any twisting. I learned this from Anne over at Philosopher’s Wool when we visited their farm this summer. You can see both basic fair isle technique and everything I’m about to show you in video technique over on their website, here: http://www.philosopherswool.com/Pages/Twohandedvideo.htm So if you prefer video tutorials, let Anne’s soothing tones explain it to you. I like photo tutorials, so I’m giving you my own version. (Anne recommends catching the yarn for floats longer than two stitches, which is a technique called weaving. I elect not to do it this way, because it makes the float show through on the right side a bit, and it’s unnecessary. But to each his/her/its own.)
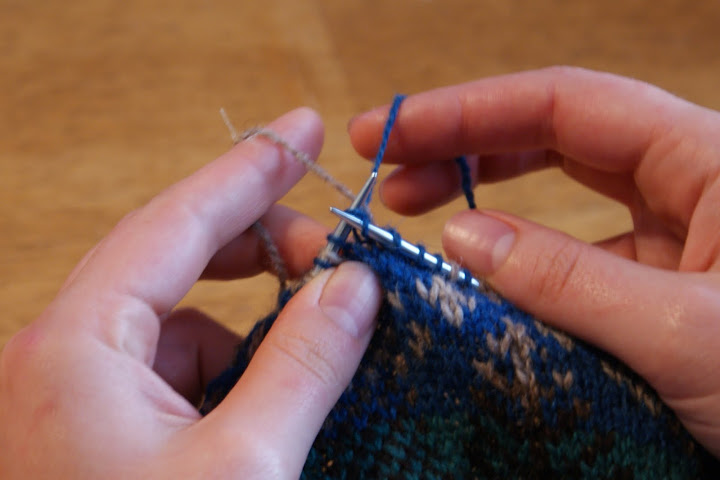
There are two different techniques, one for catching the color in the left hand behind a long stretch of color in the right hand, and other other for the opposite. First, I’ll show you how to catch the left-hand color (grey, in this case) behind a long stretch of right-hand color (blue). So below, I’ve just done three blue stitches, and I’d like to do three more, but I’m going to catch the yarn first.

The first thing is to lift the left hand yarn up (I do this by lifting my left index), so that when I insert the working needle into the next stitch, the point of the working needle is below the grey yarn.

Then I wrap the blue yarn around the working needle, going under the grey yarn as I do so.

The grey yarn is now caught, so I can return my left hand to its normal position and complete the blue stitch normally, and knit the last two stitches in the 6-stitch stretch.

Easy, right? Catching behind the left-hand yarn is a little more involved, but still quite manageable. Below I’ve done three grey stitches out of a six-stitch stretch, and I’m going to catch the blue before I go on.

First, I insert the working needle normally into the next stitch.

Then, I wrap the yarn I don’t want to be the next stitch – the blue – around the working needle.

Next, I also wrap the yarn I do want – the grey – around the working needle.

Then I unwrap the blue from the working needle, and the blue is now caught.

I can then complete the stitch, and do the last two grey stitches.


To review: You wrap the yarn you don’t want for the next stitch, then the yarn you do want, then you unwrap the yarn you don’t want out from the working needle, and you complete the stitch normally by pulling the yarn you do want through the previous stitch. Anne has a little mantra to help you to remember: “Don’t, Do, Out, Through.” It’s really brilliant.
Below, you can see what the back of my work looks like with the caught stitch. Closest to the right is the stretch of six grey stitches; you can see them on the needle. The caught blue yarn is behind and below the third stitch from the right, and you can see just how long that float would have been if it had to cross all six stitches. To the left of that are the six blue stitches, with the grey yarn caught behind and above the fourth blue stitch from the left.

Using this technique, you can do stretches of up to 11 stitches of one color – 5, catch behind 1, 5. Longer than that and you’ll have to do more than one catch, but that’s not a problem. Alongside the basics from yesterday, you can make just about any fair isle pattern out there that uses two colors per row, and can figure out all you’d really need to do more complicated, less traditional fair isle.
Sometime in the not-too-distant future, when we get to that point, I’ll do some posts on more advanced techniques associated with fair isle: namely corrugated ribbing (which you could almost definitely figure out for yourself if you can do the above; i just like sets), and the terrifying experience of steeking.

Thank you so much for this post. I learned to knit fairisle from my mother, who was self-taught, and her technique involved using only the right hand to knit both colours. As you can imagine, this takes twice the time to knit! I have been trying to teach myself to knit both colours using both hands but struggle with the tension in the unfamiliar left hand – I suppose this will come with practise? (I have been studying how you hold your wool…..)
LikeLike
Lynda – it does definitely get better with time and practice. Since everyone’s different, I’d encourage you to try different ways of holding your yarn in the left hand, to see if one feels better, until you find that sweet spot. Just searching for videos on youtube about “continental” knitting will turn up bunches of options, I’m sure. Good luck!!
LikeLike
I may never get around to working anything using Fair Isle, but if I do, I will have this most excellent tutorial to guide me.
Thank you for making it!
LikeLike
Wow I wish I had seen this before I started on my daughters knit gloves. It would have made things much easier. I am a self taught kniter and now realise why it seemed so difficult. I am now comtemplating redoing the glovesbecause I have some yarn stranding sometimes over as many as 9 stitches. Maybe I can just tack the long floaters? I am 3/4 of the way finished the 2nd glove and would hate to frog both gloves back to the solid(ribbing). I will try the 2 handed method with the rest of the glove. Thanks you have really made your instructions very clear and easy to follow.
LikeLike
I am having difficulty catching the yarn on the purl side in my colorwork . . . specifically when I’m working the left hand yarn and needing to catch the right hand yarn (1 color in each hand). I can catch the left yarn when working the right hand yarn no problem, but usually have to do the twist method when it’s the left hand yarn that’s working.
Thanks!
LikeLike
Hi Donna- purl side, you say? I am not sure what to tell you. Traditional fair isle is always, to my knowledge, worked in the round so you never have to work the purl side – because of the difficulty of seeing what’s going in with your colors, if nothing else. You might be stuck dropping and twisting if your pattern really has to be worked flat. Sorry 😦 if I am ever stuck in that position I will experiment and see if I can find a solution.
LikeLike
Thank you so much for this tutorial! I just started my first Fair Isle project last night and have some long floats to deal with. I’ve looked at several tutorials and this one is by far the most clearly written and with the most illustrative photos. I feel confident now! Now to get back to my needles…
LikeLike