I am on a roll with the blogging at the moment. I’ve discovered that while it takes two hands to knit, and a whole body to spin, thanks to mobile technology, it only takes one hand to blog. It’s nice to have a creative outlet – I find post-baby is a time with lots of swirling thoughts, and it’s lovely to catch up on expressing them.
Speaking of catching up, today I finally want to record my results from the Wool n’ Spinning color and breed study from Oct. 2017-March 2018. I took these pictures nearly two months ago, but finally made a few minutes to get them off my DSLR so I could share them with you.

The color subject was combination drafting/spinning, and the fibre was Finn wool. I’ve not blogged about it at all, but I discussed my spinning process in the ravelry group here. In this post I’ll focus on the finished products, both yarn and knitting.

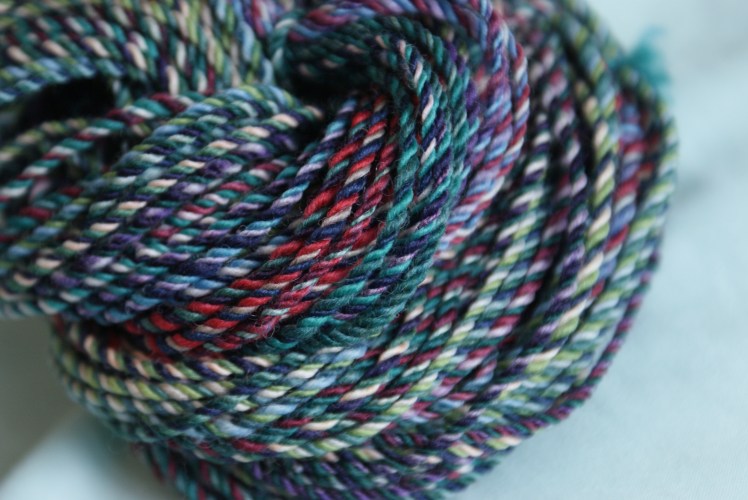
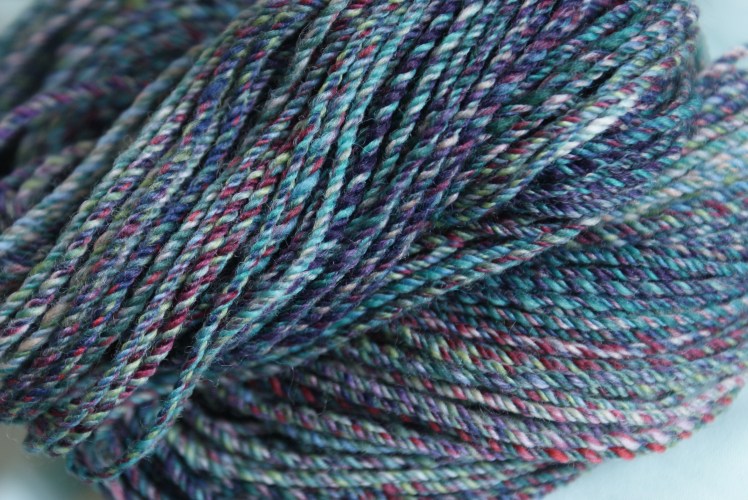
Background: Katrina dyed three quite different colorways, and I ordered the package with two ounces each.
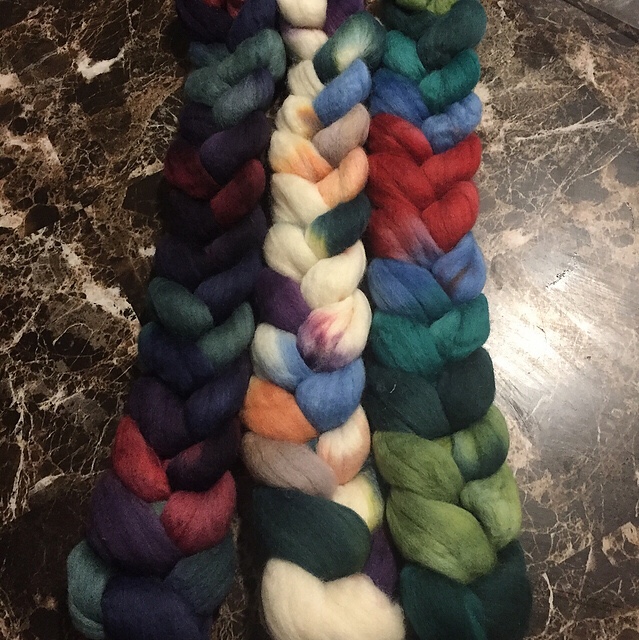
As I watched others spin their fiber, I was most interested in the samples which compared combination plying and combination drafting. [For the uninitiated: in a combo spin, the different plies (strands) are each a different colorway. In a combo draft, each of the plies is made from all three colorways held together.] I wanted a closer look. To learn a little more, I added another variable: whether the top was stripped very thin or not.

This looks like a hot mess, but it is in fact a Plan. I planned four samples, and spun them in ascending order of difficulty:
1. Combo ply, stripped thin (1/16 top)
2. Combo ply, stripped thick (1/4)
3. Combo draft, stripped thin (1/16)
4. Combo draft, stripped thick (1/4)
In all cases, each strip was the entire length of the top.
I’ll use these numbers to refer to the samples throughout; hopefully that’s clear enough.
Here are the finished samples in that order:

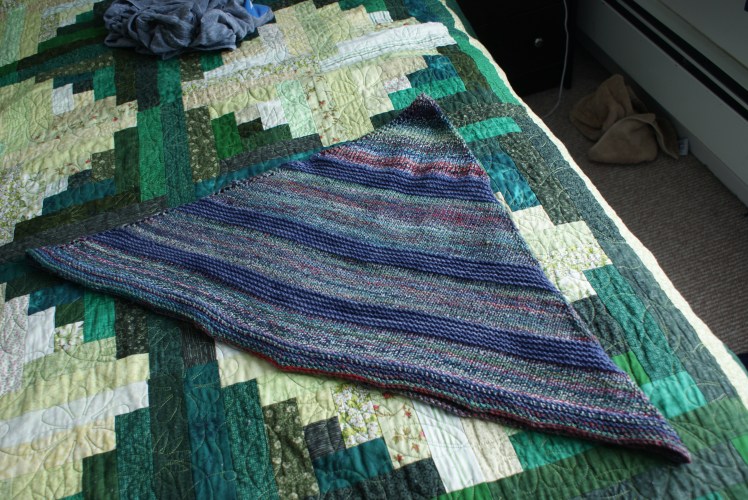
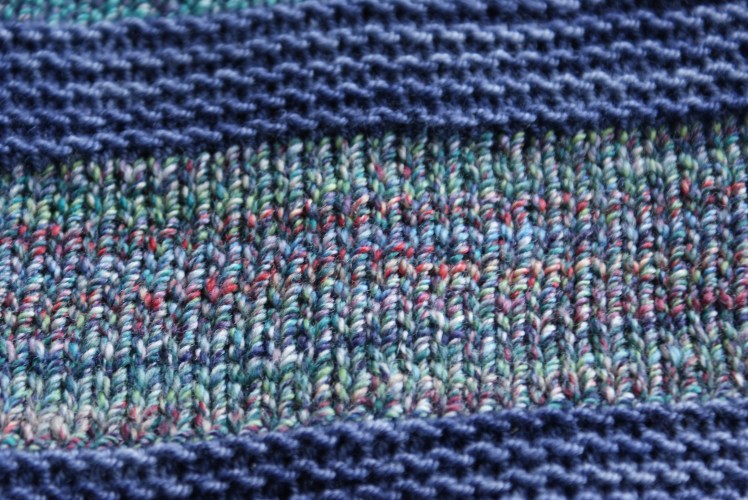
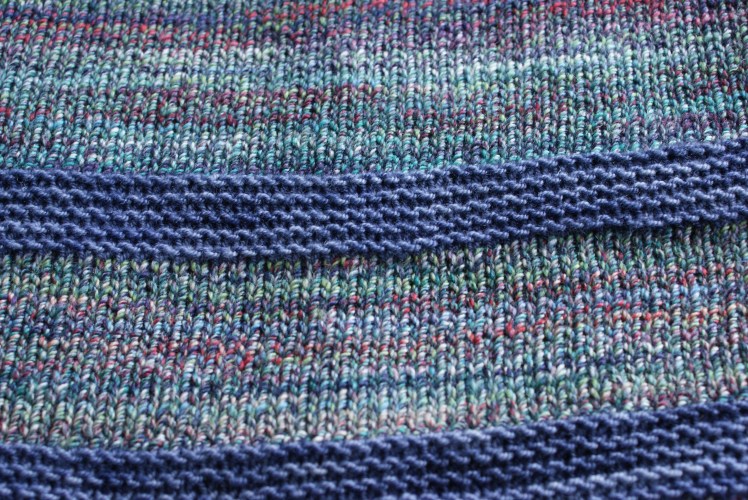
I knit them up into the Escarpment Cowl. It’s a similar sillouette to a plain triangle shawl, which starts small at the top, and grows with decreases at the centre and sides/back. I interspersed my bands of handspun with some sock yarn in garter stitch, so I could have clear borders between the different samples.
#1: Combo Ply w/ Thin Strips
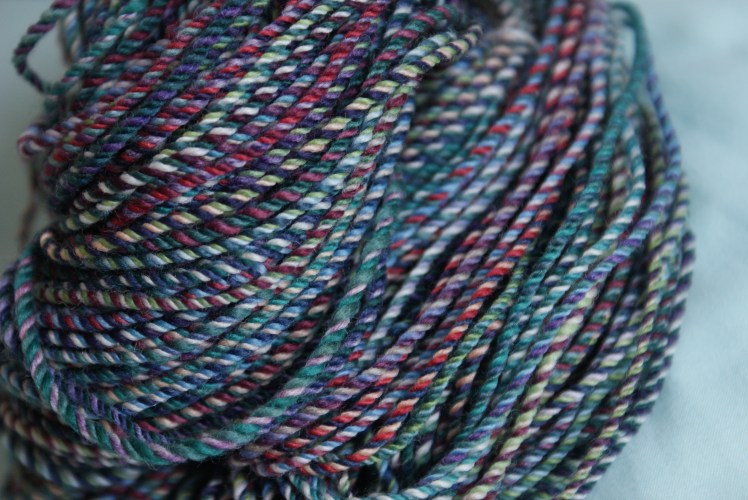
For #1, I spun thin strips, three colors to three bobbins, and plied them together. I should say this was all worsted draft at 11.5:1; I put all the really nitty details on the project page. It made a fabulously bouncy three ply. No two sections of the yarn are the same. It’s so fun to see all the colors play together differently.
A frequent comment about combo plied yarns, and an issue for combo spinning in general, is that they stripe. In this case, having three plies and three colors involved made some difference, and stripping the top quite thin made the stripes as thin as possible. Of course they are even thinner here because I put them at the bottom of my triangle shape. If you want to combo ply and want to minimize striping, I think this is the way to manage it. And striping is an issue with any wildly multicoloured handpainted top, I should think, even when only one colorway is involved. It’s not at all necessarily a bad thing, just something to consider when you’re designing your yarn.
#2: Combo Ply w/ Thick Strips
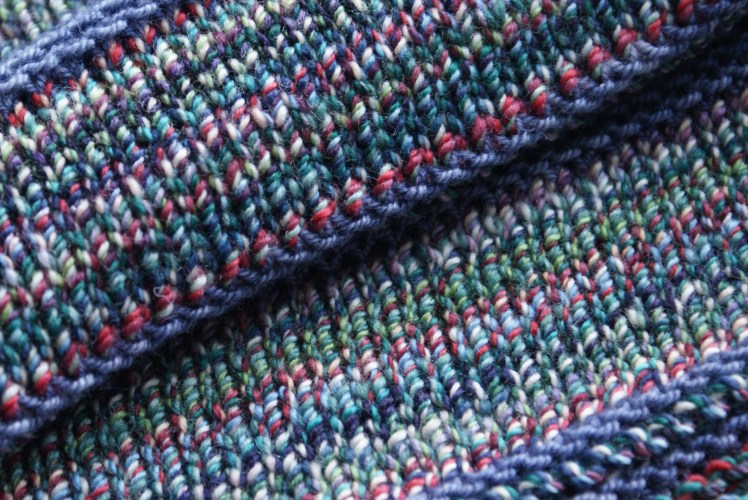
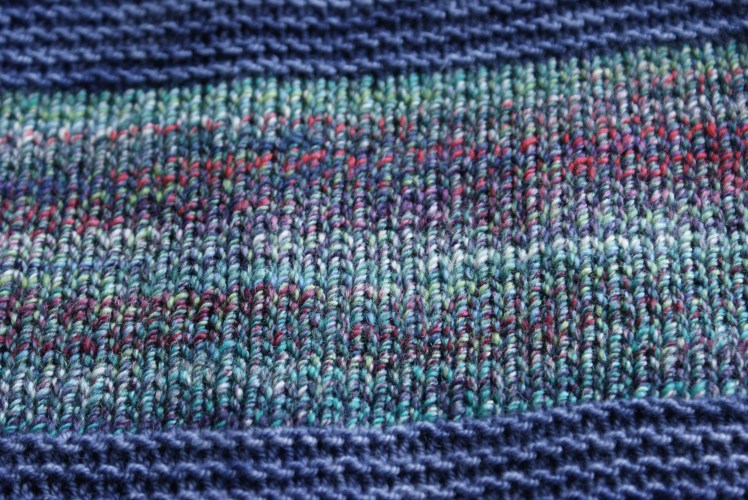
#2 used thicker strips of fiber the same way. You can see that this resulted in longer runs of color in each ply, meaning very noticeable striping in the finished knit.
This sample was a bit of an oops technically: because of my own user error, the singles ended up rather thicker but I put in the same amount of twist, which meant they were overtwisted. The yarn didn’t spring back and bounce when plied, but stayed very ropey. Still, that was a good mistake to make in a way, to see how a fiber acts with too much twist.
Also, the overtwist made plying very unmanageable, resulting in a lower twist angle than I had intended. It made for a good illustration of how twist angle can change color: lower ply angle = bigger dots of color.
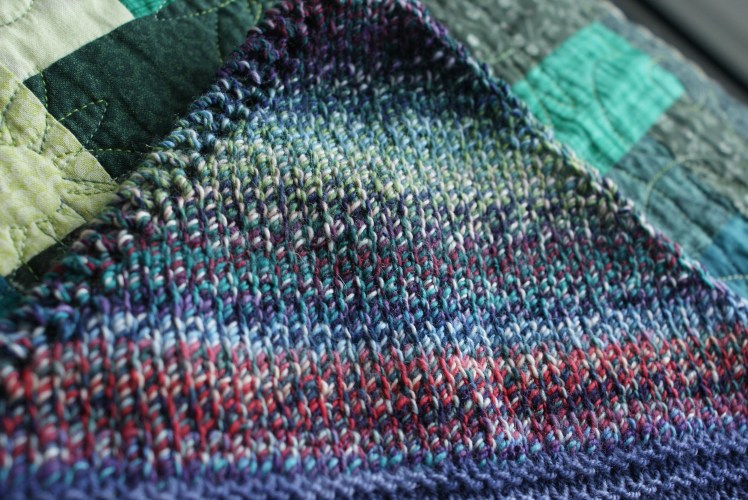
I decided to exaggerate the striping of sample #2 by putting it at the top of the triangle. It’s really very complex and beautiful with the colors shifting through each other at different rates (the color runs in the different colorways were all different lengths).
At the same time, the overtwist made the stitches very jagged. As a fabric, it’s thick, pebbly, and almost stiff. I knit it down on smaller needles than it wanted, because I wanted it go cohere with the rest of the samples, which were a fair bit thinner. Really what I should have done is put this sample at the bottom and knit it on larger needles, letting it flare a bit. But then it also would have been a very thin stripe. Oh well!
In this picture you can see how different the two combo ply fabrics are:

#3: Combo Draft w/ Thin Strips

#3 changed things up dramatically: I held three thin strips together for each single. It wasn’t as difficult as I thought, since the strips were thin. The singles were so beautiful and interesting to spin. There was striping in the singles themselves, and I think the next step in this exploration would have been to chain ply singles like these.
Interesting that there are stripes in this finished section. Or is it pooling? I did spin all three plies exactly the same – three strips going together on three bobbins – so it could be an accident of alignment? That would be odd. It’s hard to tell what’s going on.
Still, I think it’s gorgeous. The dots of color are so much smaller than in the combo spins that it’s close to optical blending. Even the stripes look like clouds of separate, deeply complex shades moving past each other.
#4 Combo Draft w/ Thick Strips
This was the most difficult spin, because I was trying to manage three wide strips held together for drafting. I managed it by predrafting them together, but this was not easy either. At this point, I had spun the same singles enough that I was able to achieve a surprising amount of consistency (for me), and I did that by just accepting that when one of the strips took over for a while, that’s what it had to do. So you can pretty much tell that the individual plies have larger chunks of single colors, while other parts are more blended. All in all, it made for an even more complex yarn. Maybe because of those irregularities, it’s the one knitted sample in which I can’t really detect any striping at all.
Still, it’s very very similar to #3. I’m not sure any improvement in #4 is worth the additional hassle of spinning that way.

The Escarpment Cowl itself, into which I knit these samples, is a free pattern that makes a great canvas for handspun. The original is quite a bit smaller, but it’s top down, so you can use up all your yarn, and you can really use any weight of yarn. As you can see from my picture up above, it’s basically a big ol’ triangle. It’s actually an identical shape to those 70’s ponchos that had a comeback maybe 10 years ago. Those were formed by casting on a circle, then had two mitered increase points at the front and back. (By contrast, a top-down raglan sweater yoke has four mitred increase points.) The Escarpment Cowl ends up in that same shape, but because of how it’s constructed, the neck hole is shifted back. So, logically, if you had a lot more yarn and just kept knitting and knitting at this, it would become a front-heavy poncho. This is getting close.
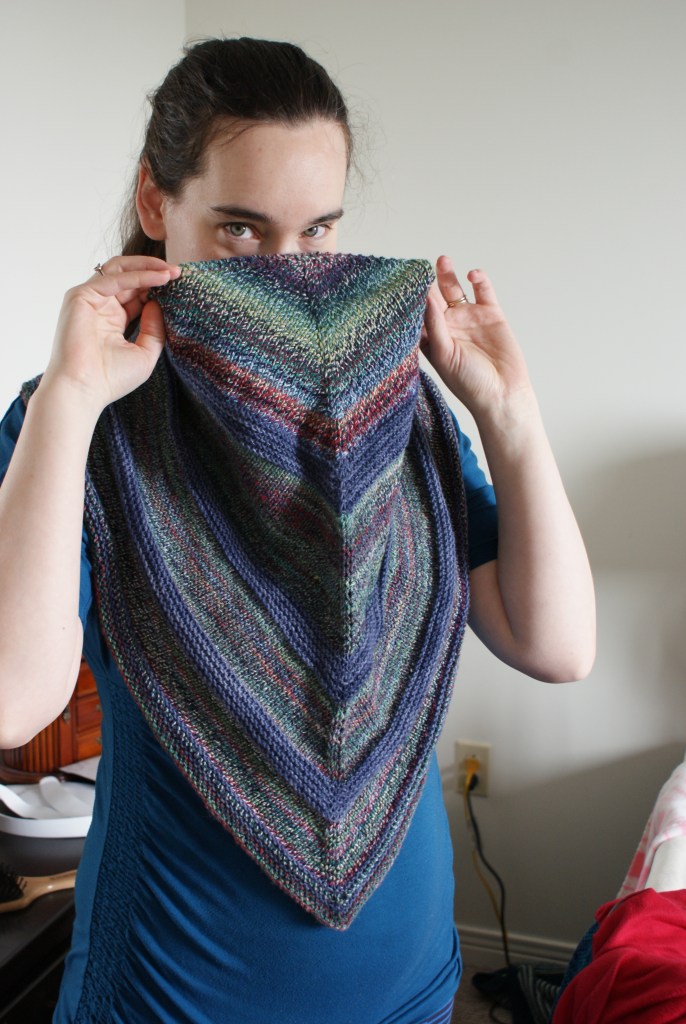
I made the neck hole too big, and putting the thickest yarn/fabric portion at the top creates an odd structured effect. I am accepting it as it is, though. I like the extra color interest near my face. This is an indoor garment for me, so I don’t need it to sit higher in order to be really warm around my neck.

I’m finding this a surprisingly wearable garment for me. It provides the extra warmth of a shawl without constantly falling off me. (I just can’t figure out how people who run after kids all day wear shawls. If you have any tips, please lay them on me.) This doesn’t fall off, and it’s actually proved to be a handy sort of modesty-cover when nursing with v-neck or crossover shirts. I pull those shirts down to nurse baby, and while this doesn’t exactly cover, it does let us do what we need to without exposing my entire decoletage. (Not that I’m suggesting you should nurse with a cover if that’s not your bag. I don’t use a cover per se, but I do dress strategically when I go out so that I am covered an amount that I feel comfortable with.)
I learned so much from this study. I made some beautiful yarns with a lot of nuance that I would use differently in different instances. Katrina made three colorways that were very different, but were cohesive enough that it would have been almost impossible to make them look bad together. I learned about speckle-dyed tops and those with white space, and how they make for delicious surprises. I learned so much about twist, and about how different dots of color might make very different looks in a fabric. And I learned that combo drafting is not so scary; I could totally spin a sweater quantity holding two or three thin strips together.
Thank you Rachel and Katrina for a memorable and helpful study!

Gorgeous!
LikeLike
Thank you!
LikeLike
It looks great! The colors work….I especially like the wider stripes. Nice pattern choice.
LikeLike
Thanks mum!
LikeLike